
Rapid prototyping and traditional manufacturing solve the same problem — turning a design into a physical part — with opposite economics. Rapid prototyping uses tool-less processes such as 3D printing, CNC prototype machining, and vacuum casting to produce parts in days with zero tooling investment. Traditional manufacturing uses hard tooling — injection molds, forging dies, stamping tools — to produce thousands of identical parts at a fraction of the per-part cost once that tooling is paid off.
Neither method is universally better, and choosing wrong in either direction costs money — staying on rapid prototyping past the point where tooling would already have paid for itself, or cutting a steel mold before a design has passed its first functional test. This guide compares both methods on cost, lead time, tolerance, material choice, and minimum order quantity, works through a real cost-crossover calculation, and covers the bridge-tooling option most buyers are never shown.
The comparison below comes from a shop that runs both sides of this decision daily. Manufyn’s rapid prototyping service and its production-scale batch production and mass manufacturing capabilities operate from the same ISO 9001 certified, strictly in-house facility in Pune, India — so this isn’t written by a reseller with a stake in pushing you toward the higher-margin option.
What Is Rapid Prototyping?
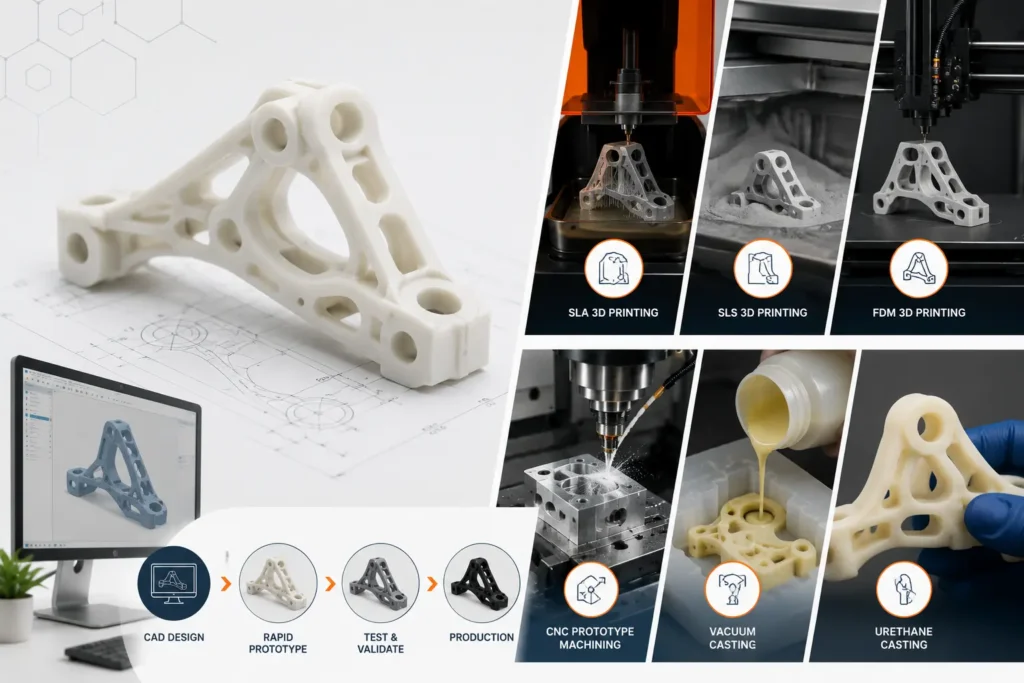
Rapid prototyping is the umbrella term for manufacturing processes that produce a part directly from a CAD file without building dedicated tooling first. That covers additive processes — SLA, SLS, FDM, MJF, and DMLS 3D printing — CNC prototype machining, and small-batch vacuum or urethane casting. Every one of these methods can go from an approved drawing to a physical part in 1–10 working days, because there is no mold or die to design, cut, and trial before the first part exists.
The Technologies Inside “Rapid Prototyping”
The technology you pick changes the trade-off, not the fundamental one: 3D printing is fastest and cheapest for form-and-fit checks, CNC rapid prototyping gets closest to production material properties, and vacuum casting and rapid injection moulding bridge the gap toward production-representative plastic parts. For the full technology breakdown, see our guide to the types of rapid prototyping and the complete rapid prototyping guide for engineers and buyers.
What Is Traditional Manufacturing?
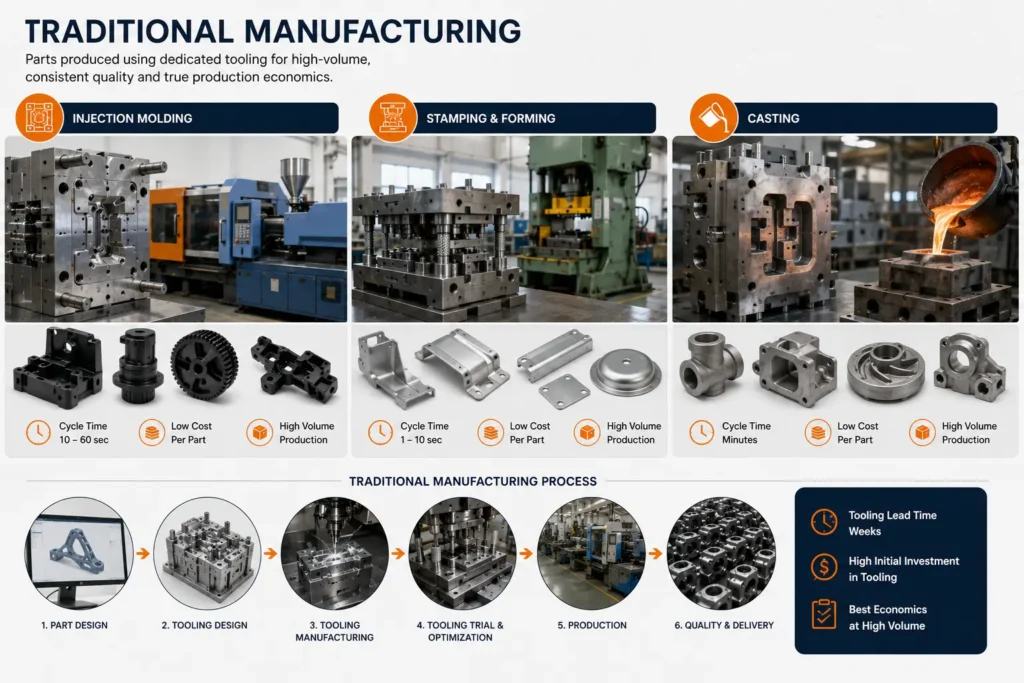
Traditional manufacturing produces parts from dedicated tooling built specifically for that part — injection molds for plastics, forging or stamping dies for metals, and production-grade casting tooling for both. The tooling is expensive and takes weeks to design, cut, and trial, but once it exists, cycle times drop to seconds or minutes per part and material costs fall to true bulk pricing. That combination is what makes traditional manufacturing dramatically cheaper than rapid prototyping at volume, and dramatically more expensive at low volume.
The Processes Covered in This Comparison
The processes covered under “traditional manufacturing” here are injection molding, casting (die, sand, gravity, and investment), forging, and production-run sheet metal fabrication using progressive dies rather than one-off laser cutting and bending. Design rules differ meaningfully between the tool-less and tooled version of the same geometry — our injection molding design guide and casting guide cover the wall-thickness, draft-angle, and gating rules a prototype-only design usually breaks the first time it meets a real mold.
How Do Rapid Prototyping and Traditional Manufacturing Actually Compare?
The table below reflects the ranges Manufyn’s engineering team quotes against day to day in 2026. Treat every figure as a planning band — your exact number depends on part geometry, material, and finish — but the direction of each comparison holds across nearly every project we see.
| Factor | Rapid Prototyping | Traditional Manufacturing |
|---|---|---|
| Tooling investment | $0 — no dedicated tooling required | $3,000–$15,000 bridge tooling; $10,000–$100,000+ production steel tooling |
| Lead time to first part | 1–10 working days | 4–12 weeks for tool design, cutting, and trial |
| Cost per part at 1–50 units | $20–$500+ depending on process and size | Effectively prohibitive — tooling cost dominates |
| Cost per part at 5,000+ units | Still $15–$100+ per part — no tooling to amortise | Often $0.50–$20 per part once tooling is paid off |
| Design change cost | Re-programme or re-slice — usually no added cost | $1,000–$20,000+ to re-cut or modify tooling |
| Typical tolerance | ±0.05 mm (CNC) to ±0.5 mm (3D printing) | ±0.05–0.1 mm, repeatable part after part |
| Minimum order quantity | 1 piece | Typically 500–1,000+ pieces to justify tooling |
| Material match to production | Close with CNC; approximate with most 3D printing resins | Exact — the actual production resin or alloy |
| Best suited for | Design validation, low volume, fast iteration | Committed volume, lowest cost per part, long product life |
Buyer takeaway: rapid prototyping wins on every factor except cost per part at volume, and traditional manufacturing wins on cost per part at volume and nothing else. Every other row in this table only matters until you know your real production number.
At What Quantity Does Traditional Manufacturing Become Cheaper?
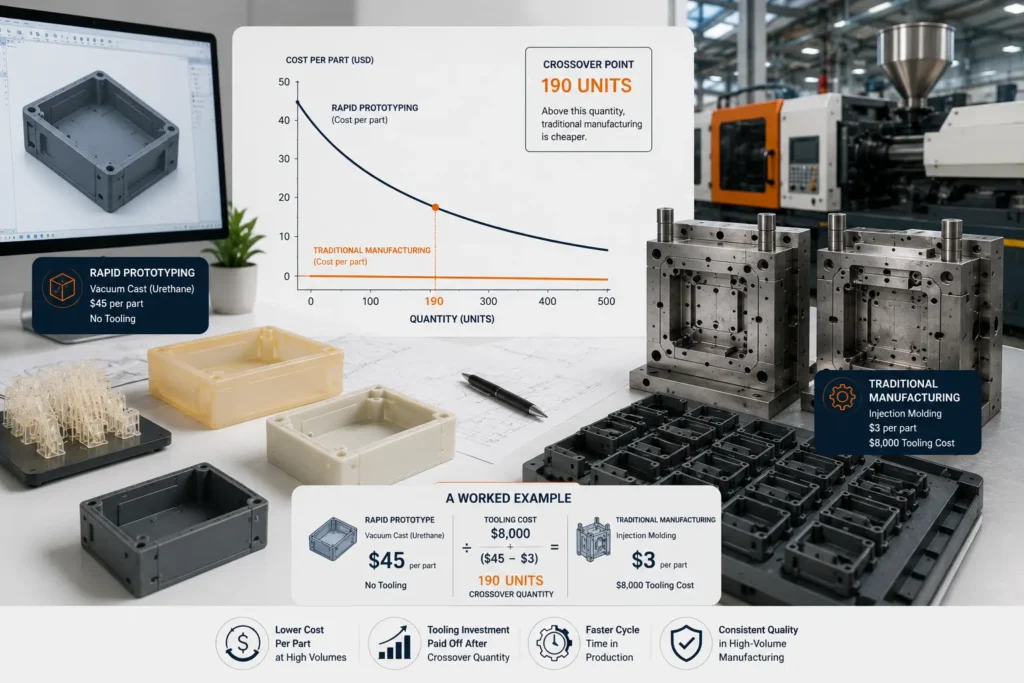
Every rapid-prototyping-versus-tooling decision comes down to one equation: tooling cost ÷ (rapid prototyping cost per part − traditional manufacturing cost per part) = the crossover quantity — the unit count above which cutting a tool has already paid for itself.
A Worked Example
Take a mid-size plastic enclosure. Vacuum-cast in urethane resin as a rapid prototype, it costs roughly $45 per part with no tooling. Injection-moulded from an $8,000 aluminium bridge tool, the same part costs roughly $3 per part in resin and cycle time. The crossover point is $8,000 ÷ ($45 − $3) = 190 units. Below 190 units, staying on vacuum casting is cheaper; above it, the bridge tool has already paid for itself and every additional part is pure margin improvement.
The number moves with every variable — part size, wall thickness, cavity count, and whether you go straight to steel or step through aluminium bridge tooling first — which is why we work this calculation against your actual drawing rather than quoting a single rule of thumb. Our rapid prototyping cost guide and injection molding vs 3D printing cost comparison work through additional examples at different part sizes.
Not sure where your part sits on this curve? Send Manufyn your drawing and expected annual volume — we’ll model your real crossover point and quote the prototype and production route side by side, both within 24 hours.
What Is Bridge Production, and Should You Use It?
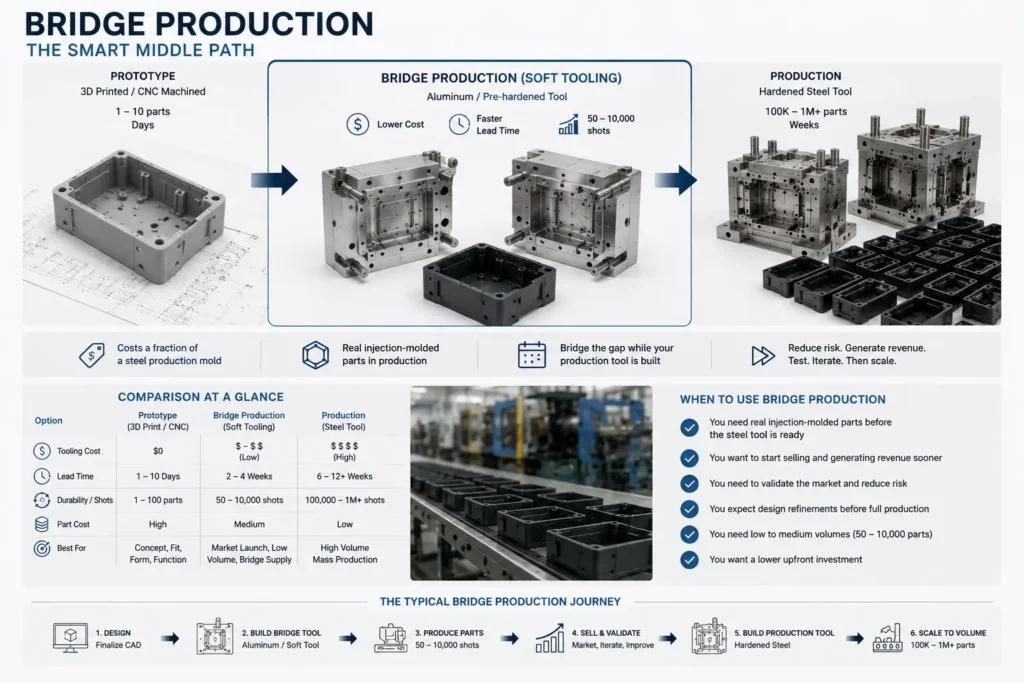
Bridge production — also called bridge tooling or soft tooling — is the middle path between a one-off prototype and a full steel production mold. An aluminium or pre-hardened tool costs a fraction of a hardened production mold, runs 50 to 10,000 shots depending on material and geometry, and lets you sell real, injection-moulded parts while the hardened production tool is still being cut. It is the most under-used option in this comparison, because most buyers are only ever quoted the two extremes — 3D print or full production mold — and never shown the step in between.
A Rough Framework by Volume
1–25 units suits vacuum or urethane casting with zero hard tooling; 50–10,000 units suits an aluminium bridge tool; beyond that, a hardened steel production tool amortises fastest. Manufyn has walked exactly this path for clients moving from a validated prototype to a production-ready mold without re-sourcing — see how a cost-effective tooling development project and a 3-plate injection mould build played out end to end.
Which Rapid Prototyping Technology Graduates to Which Production Process?
| Rapid Prototyping Technology | Traditional Equivalent | Typical Graduation Point |
|---|---|---|
| FDM / SLA / SLS 3D printing | Injection molding | 50+ identical parts in production-grade resin |
| CNC prototype machining | CNC production machining or stamping | Usually 500+ pieces, sooner for very simple geometry |
| Vacuum / urethane casting | Aluminium bridge tool, then production injection molding | 25–200 units, process-dependent |
| Laser-cut and formed sheet metal prototype | Progressive die stamping | 10,000+ flat or formed parts per year |
| SLA investment-casting pattern | Production investment or die casting | 500+ units once pattern tooling is amortised |
For a deeper look at any single technology, see our guides to 3D printing for rapid prototyping, CNC rapid prototyping, and rapid prototyping materials, or the production side in our CNC machining and sheet metal fabrication service pages.
When Should You Choose Rapid Prototyping?
- Design validation, first article, and form-and-fit checks
- Frequent design iteration, where each revision costs re-programming, not re-tooling
- Investor demos, trade-show samples, and marketing photography
- Lifetime volume under roughly 200–500 units
- Urgent timelines that can’t absorb 4–12 weeks of tooling lead time
- Unvalidated market demand — startups proving a product before committing to volume
Our guide to what rapid prototyping is used for and real rapid prototyping project examples cover these scenarios in more depth, and our fast-turnaround manufacturing guide for startups is written specifically for the pre-tooling stage.
When Should You Choose Traditional Manufacturing?
- The design has passed functional and fit testing
- Committed annual volume in the thousands or tens of thousands
- Production-grade material properties are required — glass- or fibre-filled resins, forged grain structure, die-cast alloy strength
- Cost per part is the deciding commercial factor
- The product lifecycle is long enough to amortise tooling many times over
Our mass manufacturing and batch production services, and our guides to batch production and when to use small-batch production, go deeper on sizing the right production tier once you’re past the prototyping stage.
Costly Mistakes Buyers Make in This Decision
- Cutting a steel production tool before the design has passed a functional prototype test
- Staying on 3D printing well past the volume where an aluminium bridge tool would already be cheaper
- Comparing “cost per part” quotes without adding tooling amortisation into either side
- Skipping a DFM review, then discovering at the tooling stage that a feature designed for 3D printing isn’t mouldable or forgeable at all
- Validating a prototype in one material and switching to a different production resin or alloy without re-testing — properties do not carry over automatically
Buyer takeaway: every one of these mistakes is caught by a DFM review before quoting. It costs nothing, and it is the single highest-leverage step in this entire decision.
How Manufyn Supports Both Sides of This Decision
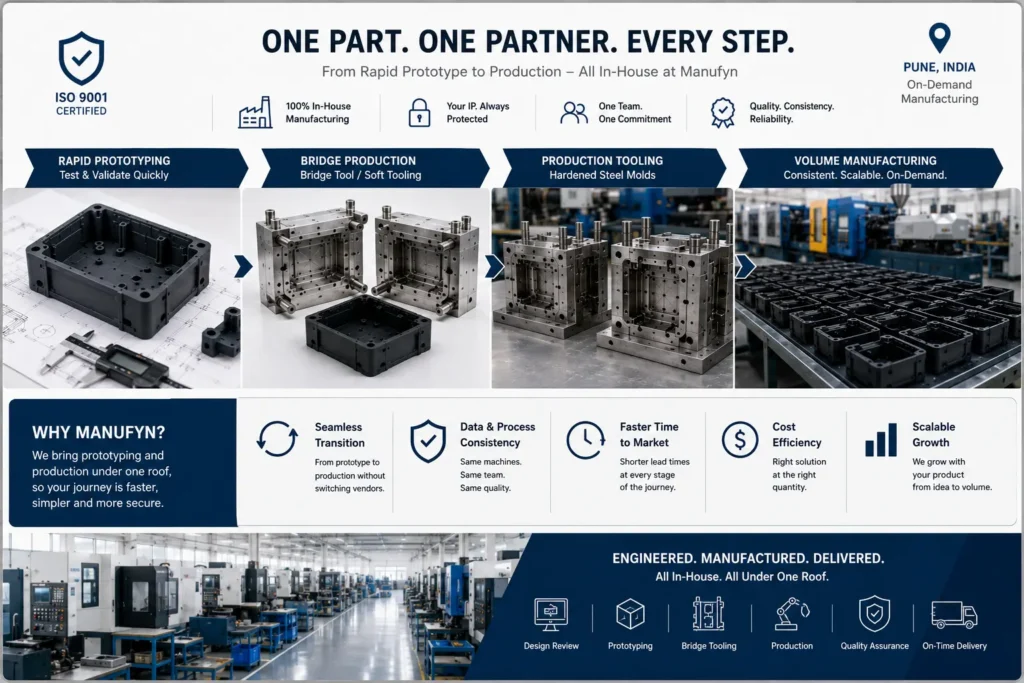
Manufyn is an ISO 9001 certified, strictly in-house on-demand manufacturer based in Pune, India — not a broker or marketplace. Because rapid prototyping and traditional production run from the same facility, your part moves from prototype to bridge tool to production mold without changing suppliers, re-sending drawings under a new NDA, or re-validating a new vendor’s process each time volume grows. The full picture of how we work is on our Why Manufyn page.
- CNC prototype and production machining, 3D printing, and vacuum/urethane casting for the prototype stage
- Aluminium bridge tooling and hardened steel production molds built in the same tool room
- Sheet metal laser-cutting and bending for prototypes, with progressive-die stamping available at volume
- Free DFM review at every stage, from the first 3D-printed part to the final production tool
- One engineering team and one point of contact across the entire prototype-to-production path
See this path in practice: a rapid prototyping and injection molding project, a medical device startup validating an injection-moulded assembly in record time, and a 5-axis machined medical device prototype.
Ready to prototype your part — or move an existing prototype into production? Manufyn delivers CNC, 3D-printed, and cast prototypes in 1–10 days, and carries the same part through bridge tooling into full production. No minimum order.
FAQs
Rapid prototyping uses tool-less processes — 3D printing, CNC machining, and vacuum casting — to produce parts directly from a CAD file in 1–10 days with no tooling cost. Traditional manufacturing uses dedicated tooling — injection molds, forging dies, stamping tools — that costs $3,000 to $100,000+ and takes 4–12 weeks to build, but drops the cost per part to a fraction of the rapid prototyping price once that tooling is paid off.
Only at low volumes. Rapid prototyping has no tooling cost, so it is almost always cheaper for the first few dozen to few hundred parts. Past the crossover quantity — the point where the tooling cost divided by the per-part price gap has been recovered — traditional manufacturing becomes cheaper on every additional part, often by 80–95%.
It depends on part size, material, and tooling type, but as a working example: an enclosure costing $45 per part in vacuum casting versus $3 per part from an $8,000 aluminium bridge tool crosses over at roughly 190 units. Below that quantity, stay on rapid prototyping; above it, the tool has already paid for itself.
Sometimes, in low volumes. CNC-machined prototypes in the actual production material can often ship as-is for runs under a few hundred units. 3D-printed parts are usually not production-representative unless the resin is specifically chosen to match production material properties, which our engineers verify before any prototype is called production-ready.
Not always. CNC prototyping can use the exact production alloy or resin. Most 3D printing resins approximate, but do not exactly match, injection-molded production plastics — glass- or fibre-filled grades in particular behave differently once moulded. Always validate final material properties before finalising a design based on a 3D-printed prototype.
Bridge production uses a lower-cost aluminium or pre-hardened tool — typically $3,000–$15,000 versus $10,000–$100,000+ for a hardened steel production mold — to run 50 to 10,000 real injection-moulded parts while the full production tool is still being built. It lets you sell or ship production-quality parts months before a hardened tool would otherwise be ready.
A CNC or 3D-printed first prototype typically ships in 1–10 working days. An aluminium bridge tool adds roughly 3–5 weeks. A hardened steel production mold typically takes 6–12 weeks to design, cut, and trial, depending on part complexity and cavity count.
CNC rapid prototyping achieves tolerances around ±0.05 mm, matching production-grade CNC and injection molding tolerances of roughly ±0.05–0.1 mm. Most 3D printing processes hold ±0.1–0.5 mm, looser than a production tool, which is why dimensionally critical mating features are usually validated on a CNC-machined prototype rather than a 3D-printed one.
Almost always rapid prototyping first. Committing to tooling before a design has passed functional testing is one of the most expensive mistakes a startup can make — a $10,000–$50,000 mold recut for a design change costs far more than a properly staged prototype-to-bridge-tool path.
Yes, when the supplier runs both in-house. Manufyn machines and 3D-prints prototypes, builds aluminium bridge tools, and cuts hardened production molds from the same ISO 9001 certified facility, so a part can move through every stage without changing suppliers or re-sending drawings under a new NDA.
Have a question about your specific project? Send your drawing to our engineers — we respond within 4 working hours.
Get Your Rapid Prototyping or Production Quote from Manufyn
Need a rapid prototype, a bridge tool, or full production? Manufyn is India’s ISO 9001 certified, in-house on-demand manufacturer — serving the US, UK, Australia, UAE, Canada, Germany, Singapore, Malaysia, and 30+ countries. Quote in 24 hours.