Injection molding methods describe how molten plastic is delivered into a mold and processed into a finished part — the injection cycle itself, the runner system that carries the melt to the cavity, and the process variants used for different materials and geometries. Every injection molding job, whatever the part, is built from the same core method: clamp, inject, cool, eject. What changes between jobs is how the melt is delivered, how the mold is filled, and how the cycle is tuned.
Understanding these methods matters because they drive the two things buyers care about most — part quality and cost per part. The runner system alone can change material waste by double digits; the cycle time sets how many parts an hour a machine produces, which flows straight into price. This guide walks through the complete injection molding cycle step by step, explains cold- versus hot-runner delivery methods with a direct comparison, and covers the main process variants and the design rules that govern all of them.
The detail here comes from a shop that runs these methods daily. Manufyn’s injection molding service operates from an ISO 9001 certified, strictly in-house facility in Pune, India — so this is written from the molding floor, not a rewritten textbook.
The Core Injection Molding Method: The 6-Stage Cycle
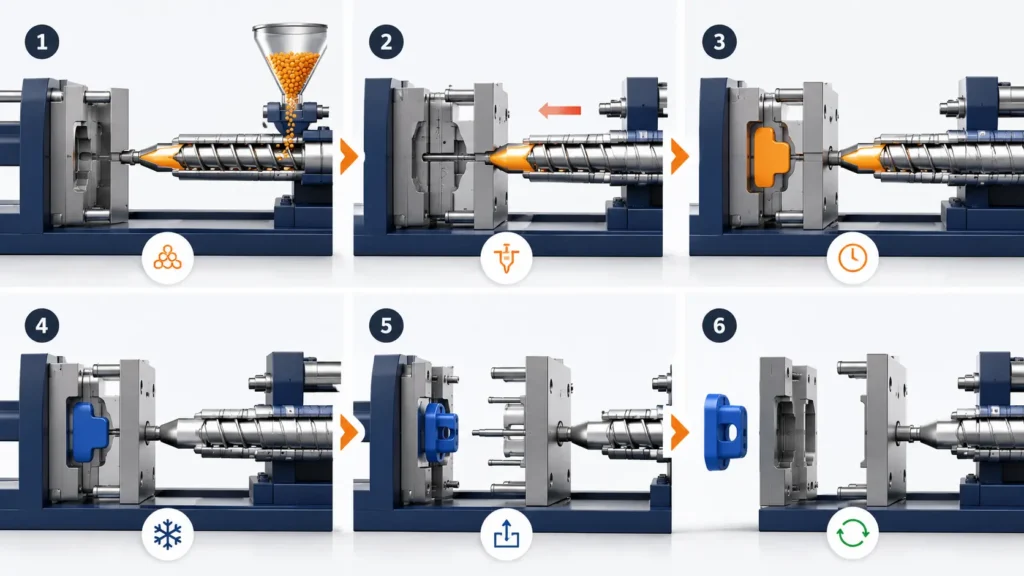
Every injection molding method is a variation on one repeating cycle. Understanding these six stages is understanding how the whole process actually works.
The injection molding cycle is the foundation every method builds on. Plastic pellets are melted, forced into a closed mold under high pressure, held while the part cools and solidifies, then ejected — and the machine immediately begins again. A single cycle typically runs from a few seconds to a minute or more depending on part size, wall thickness, and material, and because that cycle repeats for every part produced, shaving even a second off it multiplies across the entire production run. This is why cycle time is one of the biggest levers on cost per part.
| Stage | What happens | Why it matters |
|---|---|---|
| 1. Clamping | The two mold halves are closed and held under force | Clamp force must exceed injection pressure or the mold flashes |
| 2. Injection | Molten plastic is forced into the cavity | Speed and pressure control fill quality and defects |
| 3. Dwell / packing | Pressure is held to pack out the cavity | Compensates for shrinkage, prevents sink marks |
| 4. Cooling | The part solidifies in the mold | Usually the longest stage — dominates cycle time |
| 5. Mold opening | The mold halves separate | Must clear the part without damage |
| 6. Ejection | Ejector pins push the finished part out | Draft angles and pin placement prevent marks and sticking |
The cooling stage is the one buyers most often underestimate — it commonly accounts for the majority of total cycle time, which is why uniform wall thickness (faster, more even cooling) is one of the most cost-effective design choices you can make. Our injection molding design guide covers the wall-thickness and draft rules that keep this cycle short and clean.
Runner System Methods: Cold Runner vs Hot Runner
One of the biggest method-level decisions in injection molding is how the molten plastic is delivered from the machine nozzle to the cavity — through a cold runner or a hot runner. The runner is the channel the melt travels through, and the choice affects material waste, cycle time, tooling cost, and which process makes sense at your volume. It’s one of the clearest examples of a “method” decision that never appears on the finished part but shows up directly on the invoice.
| Factor | Cold Runner | Hot Runner |
|---|---|---|
| How it works | Runner cools and solidifies with the part | Runner is heated, melt stays molten between shots |
| Material waste | Higher — runner is scrap or must be reground | Very low — no runner to discard |
| Tooling cost | Lower — simpler mold | Higher — heated manifold adds cost |
| Cycle time | Slightly longer — runner must cool | Shorter — no runner cooling step |
| Best for | Low-to-mid volume, cost-sensitive tooling | High volume, expensive resin, minimal waste |
| Typical use | Prototypes, bridge tooling, smaller runs | Large-scale production, multi-cavity molds |
Buyer takeaway: a cold runner keeps tooling cheap but wastes material on every shot; a hot runner costs more upfront but pays back on high volumes and expensive resins by eliminating runner waste. The crossover depends on your volume and resin cost — which is exactly the kind of trade-off a DFM review works out against your specific part. Our injection molding cost breakdown shows how this flows into per-part price.
Injection Delivery and Gating Methods
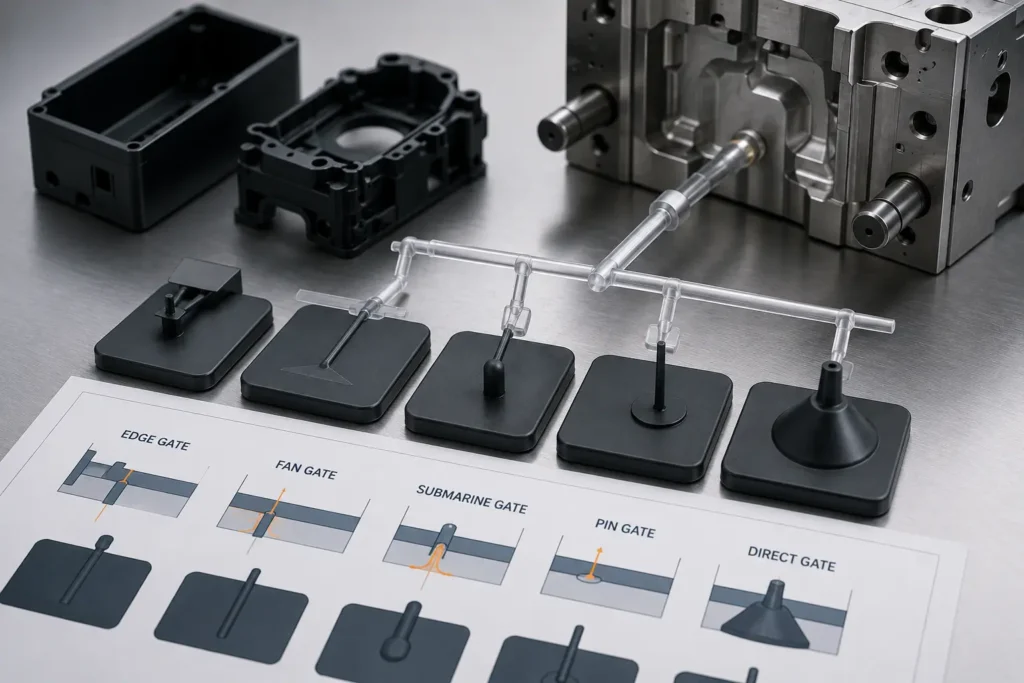
The gate is the small opening where melt enters the cavity. Its type and position shape fill quality, weld lines, and finish — a small feature with an outsized effect.
Where and how the melt enters the cavity is a method decision that quietly determines whether a part fills cleanly or shows cosmetic and structural defects. The gate controls flow direction, fill balance, and where weld lines (the seams where two flow fronts meet) end up. Choosing the wrong gate type or location is a common cause of short shots, sink marks, warping, and visible blemishes — and it’s often locked in at the tooling stage, making it expensive to change later.
| Gate type | Characteristics | Best for |
|---|---|---|
| Edge gate | Simple, on the part’s parting line | General-purpose, flat and box parts |
| Submarine (tunnel) gate | Auto-trims on ejection | Automated de-gating, clean parts |
| Hot tip / pin gate | Feeds centrally, minimal mark | Cosmetic parts, hot-runner molds |
| Fan gate | Spreads flow across a wide entry | Large flat parts, reduces warping |
Gate placement is one of the details a good fabricator flags during DFM, because it’s cheap to adjust on a drawing and costly to correct once the mold is cut.
Not sure which method fits your part and volume? Send your drawing to Manufyn — we’ll advise on runner, gating, and process, and return a firm quote within 24 hours. ISO 9001, strictly in-house, no minimum order.
Process Variant Methods
Beyond the core cycle, several method variants adapt injection molding to specific materials, geometries, and volumes. These are distinct from the process types (overmolding, insert molding, and so on) covered separately — these are variations in how the melt itself is prepared and delivered.
| Method | How it differs | Best for |
|---|---|---|
| Standard thermoplastic | Melt and inject, cool to solidify | The majority of plastic parts |
| Reaction injection molding (RIM) | Two liquids react and cure in the mold | Large, lightweight polyurethane parts |
| Gas-assisted | Gas hollows out thick sections | Thick, hollow, or large structural parts |
| Foam (structural foam) | Blowing agent creates a foamed core | Large rigid parts, reduced weight |
| Thin-wall | Very high speed and pressure | Packaging, slim electronics housings |
| Liquid silicone rubber (LSR) | Two-part liquid silicone, heat-cured | Medical, seals, flexible heat-resistant parts |
For the material-and-geometry process types — conventional, overmolding, insert, multi-shot, and more — see our companion guide to the types of injection molding.
How the Method Choice Affects Cost and Quality
Every method decision above traces back to two outcomes buyers actually feel — cost per part and part quality. Here’s how they connect:
- Cycle time → cost per part: a shorter cycle produces more parts per hour, directly lowering machine cost per unit; cooling is the biggest lever, driven by wall thickness and material.
- Runner method → material cost: a cold runner wastes material on every shot; a hot runner eliminates it but adds tooling cost, paying back only at volume.
- Gate choice → quality and finish: the wrong gate causes weld lines, sink marks, and blemishes in visible areas — expensive to fix after tooling.
- Packing pressure → dimensional accuracy: insufficient packing causes shrinkage and sink; too much causes flash and internal stress.
- Process variant → material fit: matching the method to the material (LSR for silicone, RIM for large PU parts) is what makes the part possible at all.
Buyer takeaway: almost every one of these is set at the tooling and DFM stage, before a single part is made — which is why a free DFM review before the mold is cut is the highest-leverage step in the whole process. Our injection molding cost breakdown works the full per-part cost example.
How Manufyn Applies These Methods In-House
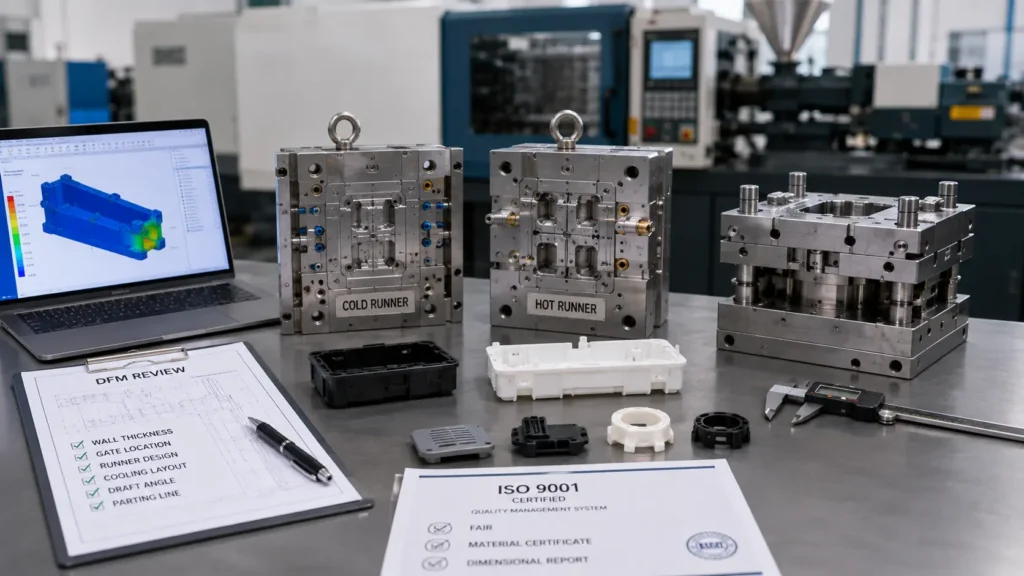
Manufyn is an ISO 9001 certified, strictly in-house manufacturer in Baner, Pune, India — not a broker. Tooling, molding, and inspection stay with one team, so method decisions come from the people who run the mold.
Every molding project starts with a free DFM review that settles the method choices before the tool is cut — wall thickness and cooling, runner type against your volume, gate placement, and packing strategy. Because tooling and production are in-house, that advice comes from the engineers who will actually run the mold, and a part can move from a machined or 3D-printed prototype into aluminium bridge tooling and then hardened production tooling without changing suppliers or re-validating a new vendor’s process.
- Free DFM review settling runner, gate, and cooling method before tooling
- Cold- and hot-runner tooling matched to your volume and resin
- Aluminium bridge tooling and hardened production molds in the same tool room
- FAIR, material certificates, and dimensional reports as standard
- No minimum order and a firm quote within 24 hours
Read more about our approach on our Why Manufyn page.
Ready to mold your part with the right method? Send your drawing to Manufyn — free DFM review, method matched to your part and volume, no minimum order, and a firm quote in 24 hours.
FAQs
At the method level, injection molding is built on a six-stage cycle (clamp, inject, dwell, cool, open, eject), delivered through either a cold-runner or hot-runner system, with gating and process variants — standard thermoplastic, reaction injection molding, gas-assisted, structural foam, thin-wall, and LSR — adapting it to different materials and geometries.
The cycle has six stages: clamping (closing the mold), injection (forcing melt into the cavity), dwell or packing (holding pressure to pack out the part), cooling (the part solidifies), mold opening, and ejection (pushing the finished part out). Cooling is usually the longest stage and dominates total cycle time.
A cold runner lets the channel of plastic feeding the cavity cool and solidify with the part, creating waste that must be scrapped or reground — but it keeps tooling cheap. A hot runner keeps that channel heated so the melt stays molten between shots, eliminating runner waste and shortening cycle time, but it costs more in tooling and pays back mainly at high volume.
For most parts, a standard thermoplastic process with a cold-runner mold is the cheapest to tool, which is why it’s the default at low-to-mid volume. Hot runners, multi-cavity tooling, and specialised variants like gas-assisted or LSR cost more upfront and only become cost-effective at higher volumes where their efficiency or capability is needed.
A cold runner produces waste material on every shot, so at high volume or with expensive resin that waste adds up significantly. A hot runner eliminates it but adds tooling cost through its heated manifold. The crossover point where a hot runner pays off depends on your production volume and resin price.
The gate controls how the melt flows into the cavity, which determines fill balance, where weld lines form, and where cosmetic marks appear. A poorly chosen gate causes short shots, sink marks, warping, and blemishes — and because it’s set at the tooling stage, correcting it after the mold is cut is expensive. It’s a key item in any DFM review.
Reaction injection molding mixes two liquid components that chemically react and cure inside the mold, rather than melting and cooling a thermoplastic. It’s used mainly for large, lightweight polyurethane parts — automotive body panels, enclosures, and housings — where its low tooling pressure allows big parts without huge machines.
Cycle time sets how many parts a machine produces per hour, so a shorter cycle spreads the machine’s hourly cost across more parts and lowers cost per unit. Cooling is the biggest component of cycle time, which is why uniform wall thickness — enabling fast, even cooling — is one of the most cost-effective design choices you can make.
Methods describe how the process works — the injection cycle, the runner and gating system, and melt-delivery variants like gas-assisted or LSR. Types describe what’s placed in the mold and how many materials are used — conventional, overmolding, insert, and multi-shot molding. Methods are about the mechanics of delivery; types are about the material and geometry configuration.
Have a specific part in mind? Send your drawing to our engineers — we respond within 4 working hours.
Have a plastic part to mold?
Get the right method matched to your part and volume, a free DFM review, and a firm quote in 24 hours — no minimum order.
Talk to Manufyn